Optimise your React.js Application
By Ayush Kumar
When building any React application developers often miss out taking into consideration the performance aspect of the application. An efficiently running application is vital for shipping an application which is bug free, light weight, resourceful and which posses great user experience. In this article we will discuss about the tools that will help you to understand the build size and ways to optimize it.
Table of contents
- What tool can we use to analyse the build size?
- Configuring
webpack-bundle-analyzerfor your React.js project - Ways to improve the build size
- Code Splitting With React.lazy and React.Suspense
- Image Optimization
- Do not add libraries unnecessarily.
- Upgrade Dependencies
- Use Gzip and Brotli Compression
- Auditing and removing nonessential/unused libraries
- Preferring Tree-Shaking compatible imports.
What tool can we use to analyse the build size?
Webpack is a modern module bundler for modern javascript applications.
When using webpack for a React.js application, it processes our package.json to build a dependency graph.
Using the entry points defined in it's configuration, it then then combines every module that our project needs
into one or more bundles.
Webpack-bundle-analyzer is a plugin that will help us go into the details of the generated chunks and to optimize it.
Configuring webpack-bundle-analyzer for your React.js project
Below is a guide on how to configure webpack-bundle-analyzer on your React.js project.
1
yarn add -D webpack webpack-cli webpack-dev-server html-webpack-plugin webpack-bundle-analyzer @babel/core @babel/plugin-transform-runtime @babel/preset-env @babel/preset-react
Make a file in the root folder with the name .babelrc and configure babel
1
2
3
4
5
6
7
8
9
10
11
12
13
14
15
16
17
18
19
{
  "presets": [
    "@babel/preset-env",
    [
      "@babel/preset-react",
      {
        "runtime": "automatic"
      }
    ]
  ],
  "plugins": [
    [
      "@babel/plugin-transform-runtime",
      {
        "regenerator": true
      }
    ]
  ]
}
Now, make a directory in the root folder with the name webpack and make a file called webpack.config.js inside the webpack directory.
1
2
3
4
5
6
7
8
9
10
11
12
13
14
15
16
17
18
19
20
21
22
23
24
25
26
27
28
29
30
31
const path = require('path');
const HtmlWebPackPlugin = require('html-webpack-plugin');
const BundleAnalyzerPlugin = require('webpack-bundle-analyzer').BundleAnalyzerPlugin
module.exports = {
  mode: 'development',
  entry: path.resolve(__dirname, '..', './src/index.js'),
  resolve: {
    extensions: ['.js', '.jsx'],
  },
  plugins: [
    new HtmlWebPackPlugin({
      template: path.resolve(__dirname, '..', './public/index.html'),
    }),
    new BundleAnalyzerPlugin()
  ],
  module: {
    rules: [
      {
        test: /\.(js)x?$/,
        exclude: /node_modules/,
        use: {
          loader: 'babel-loader',
        },
      },
    ]
  },
  output: {
    path: path.resolve(__dirname, '..', './build'),
    filename: 'bundle.js',
  }
}
Now, change the scripts to start the server through package.json. our start script will be
1
"start": "webpack serve --config webpack/webpack.config.js --open"
Now, start server with the npm or yarn.
1
yarn start
webpack will open bundle analyzer on port number 8888. The analyser would generate a page like below.
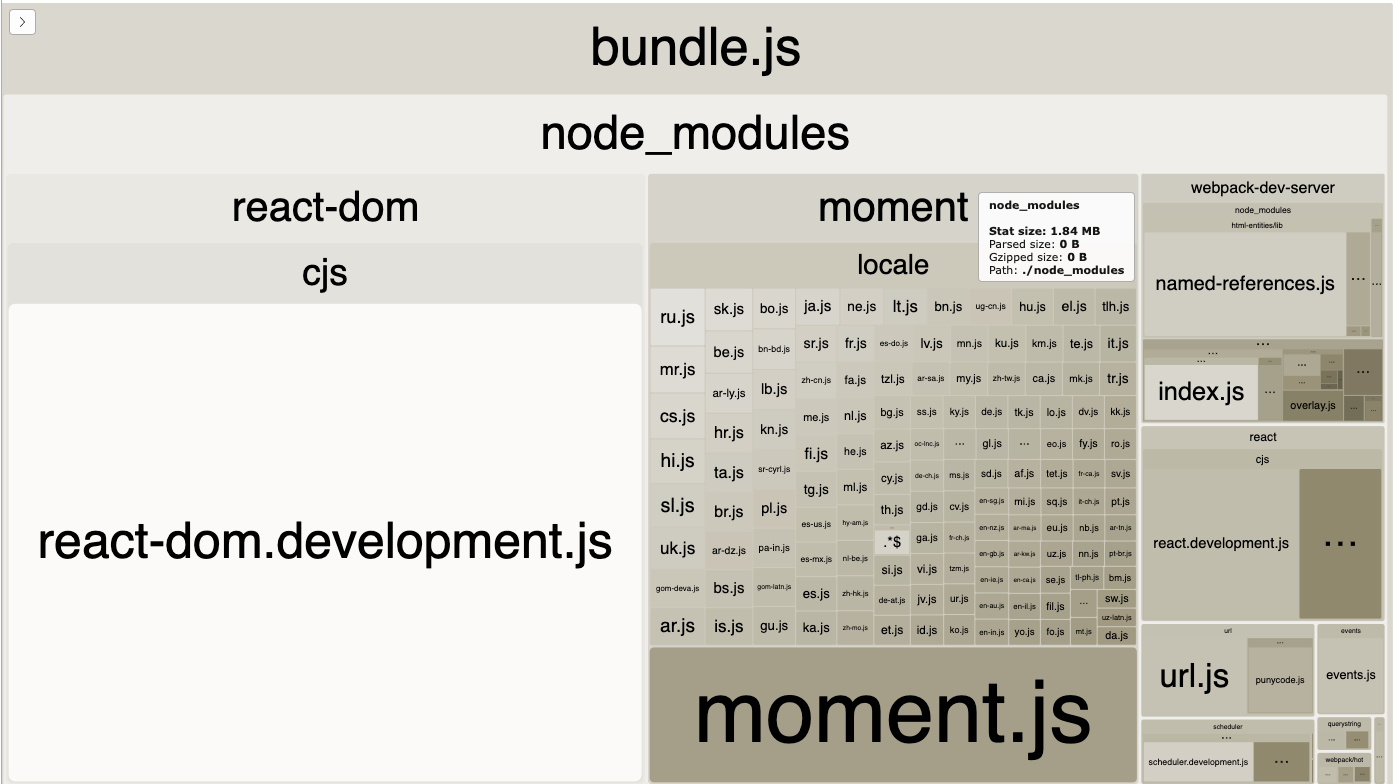
From the above image, we can identify the packages which are causing our build size to increase significantly. eg: moment library occupies a whopping 1.84mb in the generated asset chunks.
Ways to improve the build size -
1. Code Splitting With React.lazy and React.Suspense
A typical React application would consists of many components, pages, and third-party libraries.
Overtime all the javascript assets gets added up and the application generate a very large build. We've seen build size as big as 25mb.
Even on a fast internet, this takes up a lot of time to get downloaded, and thus leads to a bad user experience.
React 16.6 has introduced code spitting, which can split a large built into multiple smaller chunks.
Suspense along with code spitting provides an intuitive way to keep our user engaged while our assets is downloaded.
Let's take a below code example -
1
2
3
4
5
6
import HomePage from './pages/Home;
import SomePrivatePage from './pages/SomePrivatePage;
<Switch>
    <Route path="/" component={HomePage} />
    <Route path="/private-page" component={SomePrivatePage} />
</Switch>
route /private-page is accessible only after the user logs-in. But without code spitting the generated build would have all the imports needed for SomePrivatePage.
This makes our user download the assets needed for the page which they might never visit.
React.lazy function provides a built-in way to split the large build into smaller manageable javascript chunks with tiny legwork.
React.Suspense accepts a fallback components which allows us to display any Component while the chunk is loaded.
1
2
3
4
5
6
7
8
9
10
import react, { lazy, Suspense } from 'react';
const LazyLoading = (importFunc, { fallback = null } = { fallback: null }) => {
  const LazyComponent = lazy(importFunc);

  return (props) => (
    <Suspense fallback={fallback || 'Loading...'}>
      <LazyComponent {...props} />
    </Suspense>
  );
};
Now, let's change the way we import.
1
2
3
4
5
6
7
8
//Filename: src/Utils/load/index.js
import load from '../Utils/load;'
const HomePage = load(() => import ('./pages/Home'));
const SomePrivatePage = load(() => import ('./pages/SomePrivatePage'));
<Switch>
    <Route path="/" component={HomePage} />
    <Route path="/private-page" component={SomePrivatePage} />
</Switch>
2. Optimizing Image
Optimizing static assets like Images (jpegs, pngs, gifs) is a easy low hanging fruit one could do to improve the build size. Modern lossless compression provides an easy way to compress the images without any loss in quality. We highly recommend using an external tool like tinypng to compress all your image assets.
3. Do not add libraries unnecessarily.
It's recommended that developers take full cognizance of the impact before introducing any new Library/Framework into the codebase. Many a times, the library replacement would be a few 100 lines of code. If the introduced module is not Tree shaking compatible, it would introduce a lot of weight even though we might just it for a tiny feature.
4. Upgrade Dependencies
Regularly upgrading the 3rd party libraries provides us a easy way to access performance improvements introduced into the external packages. Due care needs to be taken to see if there are any breaking changes and the impact of the change log is fully understood.
5. Use Gzip and Brotli Compression
When generating the production React build, webpacker combines all js and css file into a minified version eg. bundle.js, style.css.
While minification is great, we can further reduce the build by serving our users compressed version of the same file. Most modern browsers supports the following compression
- Gzip Compression
- Brotli Compression
- Deflate compression
Brotli provides better compression than gzip. In our experience, Brotli compressed JS files are 14% smaller than gzip, HTML files are 21% smaller than gzip. Css files are 17% smaller than gzip.
Note: Some old browser doesn't support brotli. It better to generate both brotli & gzip compressed files to serve newer and older browsers.
Steps to follow to add compression while generating the build -
Step 1. Add the compression plugin
1
yarn add -D compression-webpack-plugin
Step 2. import compression-webpack-plugin in webpack.config.js file
1
const CompressionPlugin = require(‘compression-webpack-plugin’);
Step 3. Add CompressionPlugin to plugins of webpack.config.js file
1
2
3
4
5
6
7
8
9
10
11
12
13
14
15
16
plugins: [
  newCompressionPlugin(),
  new CompressionPlugin({
    filename: "[path][base].br",
    algorithm: "brotliCompress",
    test: /\.(js|css|html|svg)$/,
    compressionOptions: {
      params: {
        [zlib.constants.BROTLI_PARAM_QUALITY]: 11,
      },
    },
    threshold: 10240,
    minRatio: 0.8,
    deleteOriginalAssets: false,
  }),
]
If you are using Nginx to server the static assets, you would need to enable serving of compressed asset by the below nginx config.
1
2
3
4
5
6
7
8
9
10
11
12
13
14
15
16
server {
  gzip on;
  gzip_static on;
  gzip_types text/plain text/css application/json application/x-javascript text/xml application/xml application/xml+rss text/javascript;
  gzip_proxied  any;
  gzip_vary on;
  gzip_comp_level 9;
  gzip_buffers 16 8k;
  gzip_http_version 1.1;

  brotli on;
  brotli_static on;
  brotli_types text/plain text/css application/json application/x-javascript text/xml application/xml application/xml+rss text/javascript;
  brotli_comp_level 11;
  ...
}
6. Auditing nonessential/unused libraries
As the application grows, there may be stale/unused packages that are installed but can be removed.
7. Preferring Tree-Shaking compatible imports.
Many popular Javascript library provides a tree shaking way to import functions. When done this way, it only introduces that particular function and it's dependency while generating the build.
Example let's take a popular library called lodash
1
import { has as _has } from 'lodash';
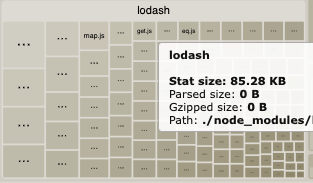
The above import statement includes the complete library of lodash into the build (530kb compressed).
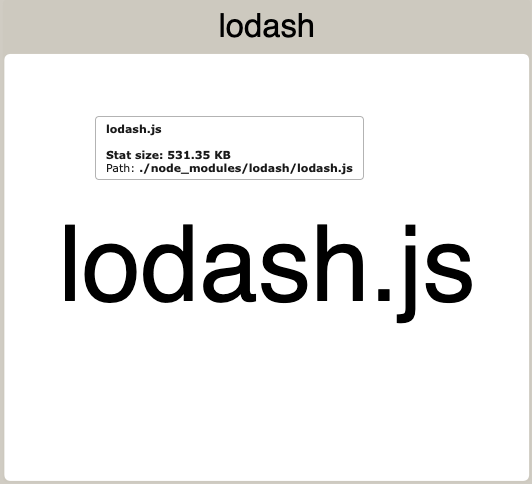
Now, replacing the above import with tree shaking compatible import would significantly reduce lodash's footprint.
1
import _map from 'lodash/map';